Sound Examples
A collection of Sound, MIDI, and I2S examples for Arduino
Setup
Introduction
Tone
Melody
MIDI
MIDI USB
MIDI Serial
MIDI to the VS1053 module
MIDI BLE
MIDI Controllers
I2S
VS1053 MP3 playback
Inventory
This project is maintained by tigoe
Making Tones and Making Music
You can generate a sound on an Arduino microcontroller using just the digitalWrite() command and the delayMicroSeconds() command, but there is a simpler way. The tone() command can play a frequency on a pin for a set period of time, and the noTone() command can turn it off. This command is more effective than the method you learned in the sound basics introduction, because it uses the microcontroller’s built-in oscillators to generate a frequency rather than relying on your program. It’s a good way to learn more about generating music in an Arduino sketch.
In this exercise, you’ll get to know the tone function, and you’ll learn how to convert a piano key’s number to its pitch. These key numbers are the numbers assigned to a keyboars in the the Musical Instrument Digital Interface (MIDI) protocol to give each piano key a unique number. Once you know a little about MIDI, you’ll be your your way to controllong synthesizers, samplers, and other electronic musical devices.
The Tone function
The parameters of the tone() command are:
- the pin number on which you want to play the frequency
- the frequency you want to play
- the time (in milliseconds) that the frequency should last for (this parameter is optional).
For example, to play middle A on pin 5 for 1 second, the command would be:
tone(5, 440, 1000);
Note: These Tone examples will play simple tones on any Arduino board. You can’t play multiple tones at the same time, however. These examples are included mainly to show how to convert between frequency values, note names, and MIDI note values, and to play a simple melody.
To try this command out, wire your board as shown in the sound basics introduction. Connect a speaker or headphone jack to pin 5 in series with the appropriate resistor (220 ohm for the speaker, 10-kilohm for the headphone jack). Then connect the ends of a potentiometer to voltage and ground, and the middle wiper pin to analog input 0 (A0) of your microcontroller. Figures 1 and 2 show the wiring for a potentiometer combined with speaker and headphone jack, respectively.
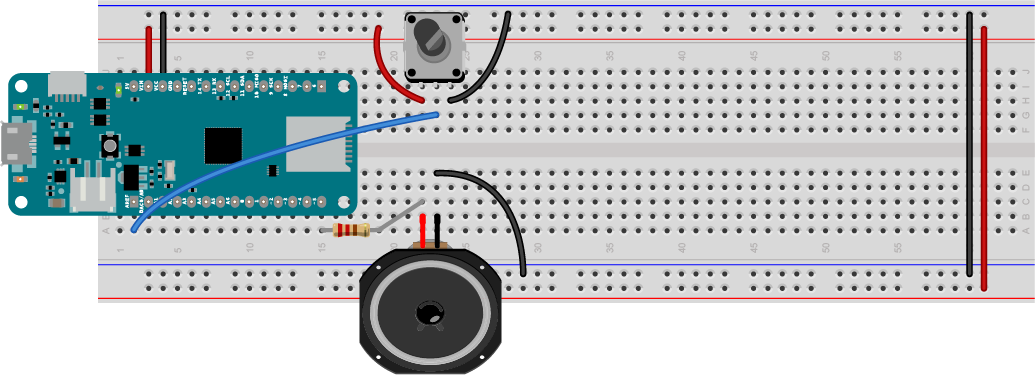
Figure 1. Speaker attached to pin 5 and potentiometer attached to pin A0. The potentiometer will be used to change the frequency of your sound.
Figure 2. headphone jack attached to pin 5 and potentiometer attached to pin A0. The potentiometer will be used to change the frequency of your sound.
To start, open the BeepChange sketch from the sound basics introduction page and make some modifications to it. Everything will stay the same up until you calculate the frequency:
const int speakerPin = 5;  // the pin number for the speaker

void setup() {
  // make the speaker pin an output:
  pinMode(speakerPin, OUTPUT);
}

void loop() {
  // read the potentiometer:
  int sensorValue = analogRead(A0);
  // map the potentiometer to a range
  // from A0 to C8 (27.5 Hz to 4186):
  float frequency = map(sensorValue, 0, 1023, 27.5, 4186);
After that, you can replace the rest with the tone() command, like so:
// turn the speaker on:
  tone(speakerPin, frequency);
  delay(30);
  // turn the speaker off:
  noTone(speakerPin);
The 30 millisecond delay is there so that the tone is on long enough for you to hear it before the next time through the loop. When you upload this sketch, you should hear the pitch of the speaker changing all the way from A0 to C8, just like the previous sketch, but this time, you’re taking advantage of the tone() and noTone() commands.
Sound to Music: Generating Equal-Tempered Pitches
So far your sketch doesn’t sound much like music. That’s because it is playing many more frequencies than you might hear in a musical composition. It’s playing 1024 different possible frequencies.
In musical compositon, different tuning systems determine the frequencies, or pitches, of the notes to be played. In European classical music tradition, the most common tuning system in the last few hundred years has been the 12-tone equal temperament system. This system divides an octave into twelve pitches, in which the frequency interval between every pair of adjacent notes has the same ratio. The pitches are arranged on a logarithmic scale, and the ratio between pitches is equal to to the 12th root of 2, or 2^1/12, or approximately 1.05946. The whole tuning system is based off a reference frequency. The 12-tone equal temperament system uses a middle A note (or A4, for A in the 4th octave), or 440 Hz, as its reference frequency. Each adjacent note differs from the one next to it by a factor of 2^1/12 or 1.05946. So the next note up from middle A, A-sharp 4, is 1.05946 * 440, or 466.16 Hz. The next note after that, B4, is 1.05946 * 466.16, or 493.88 Hz. The step between each adjacent note is called a semitone
Wikipedia’s page on equal temperament gives a longer explanation if you want to know more.
You can use this information to calculate the frequency of any note in the scale, when you know how many semitones away from the reference note your note is. You need to give each note a numeric value, and you need to know the reference frequency.
If the note value you want is called noteValue, and reference freqency is called refFreq, and the reference note is called refNote, then
frequency = refFreq * 2^((noteValue - refNote) / 12.0));
The Arduino API includes a function called the pow() function that raises a number to a power. The reference frequency and reference note number can be set as constants, or as #define statements, which are like aliases for the IDE. So that formula, expressed as a line of Arduino programming code, would look like this:
float frequency = FREQ_A4 * pow(2, ((noteValue - NOTE_A4) / 12.0));
MIDI Note Number to Pitch Conversion
Now that you’ve got a formula for calculating a note’s pitch, Let’s write a sketch that reads the potentiometer and breaks its reading into 88 steps, playing a range of pitches from the lowest note on the piano to the highest.
You know that the reference frequency of middle A, or A4, is 440 Hz. You need to decide what note value to give it. A piano has 88 notes, and middle A is somewhere in the middle. Should the lowest note be note number 0 and the highest number 87?
Synthesizers and other electronic musical instruments use a communications protocol called the Musical Instrument Digital Interface, or MIDI. MIDI can play a range of 128 pitches, and it puts the range of piano pitches in the middle, from 21 to 108. Since MIDI is very popular, let’s use its note values. In the MIDI protocol, A4 gets the note number 69, somewhere in the middle of the 0-127 range. The whole piano keyboard runs from A0 (note number 21) to C8 (note number 108). With that information, you can start the sketch.
First, define the reference pitch and note number, and set the pin number for the speaker as a constant:
// middle A is the reference frequency for an
// equal-tempered scale. Set its frequency and note value:
#define NOTE_A4 69         // MIDI note value for middle A
#define FREQ_A4 440        // frequency for middle A

const int speakerPin = 5;  // the pin number for the speaker
Syntax note: The #define keyword is the C programming syntax for giving a label, or alias, to a value. When you #define something, the compiler replaces all of the #define labels with their values before the program is compiled. It’s a bit like how you used const int to give the speaker pin a name. #defines are trickier than consts, though, because there are many #defines in the core of the Arduino API, and you might overwrite one if you don’t choose your names carefully. If you start your #define names with something unique related to your application, like NOTE_, you’re usually safe.
In the setup function, configure the speaker pin as an output as you’ve done before:
void setup() {
  // make the speaker pin an output:
  pinMode(speakerPin, OUTPUT);
}
In the loop function, read the potentimeter, and map its input range to a range of note numbers from 21 to 108:
void loop() {
  // convert sensor reading to 21 - 108 range
  // which is the range of MIDI notes on an 88-key keyboard
  // (from A0 to C8):
  int sensorReading = analogRead(A0);
  int noteValue = map(sensorReading, 0, 1023, 21, 108);
Next, use the note number and the reference frequency and reference note number to calculate the frequency of the current note, then play a note using the tone() function:
  // then convert to frequency:
  float frequency =  FREQ_A4 * pow(2, ((noteValue - NOTE_A4) / 12.0));
  // turn the speaker on:
  tone(speakerPin, frequency, 30);
  delay(30);
}
Upload this sketch to your MKR board. When you turn the potentiometer, slowly, you should hear discrete pitches, the same pitches you’d hear if you play the notes on a piano in sequence. Now you’ve got a method for converting from note number to pitch. That will be handy when you want to compose music in code.
Here is the complete ToneSimple sketch.
Conclusion
The key elements to this exercise are the tone() command, which lets you play frequencies on a pin, and the note number to pitch formula that lets you set a range of equal-tempered pitches from a range of note values, like the values on a piano. Along the way, you learned how to use the map() function as well.
You can’t play two tones at the same time on an Arduino, however, so tone() has its limits. You’ll use it in the next exercise to learn how to generate melodies, but to play polyphonic sounds, you’ll need an external synthesizer. That’s coming soon.
Now that you’ve got an idea of how to caculate pitch values for notes in a tuning system, the next exercise explains how to generate a melody.
For more on MIDI note to pitch mapping, see Note names, MIDI numbers and frequencies from the University of New South Wales.